The surface
The surface is a digital console split into two halves, with a header on top.
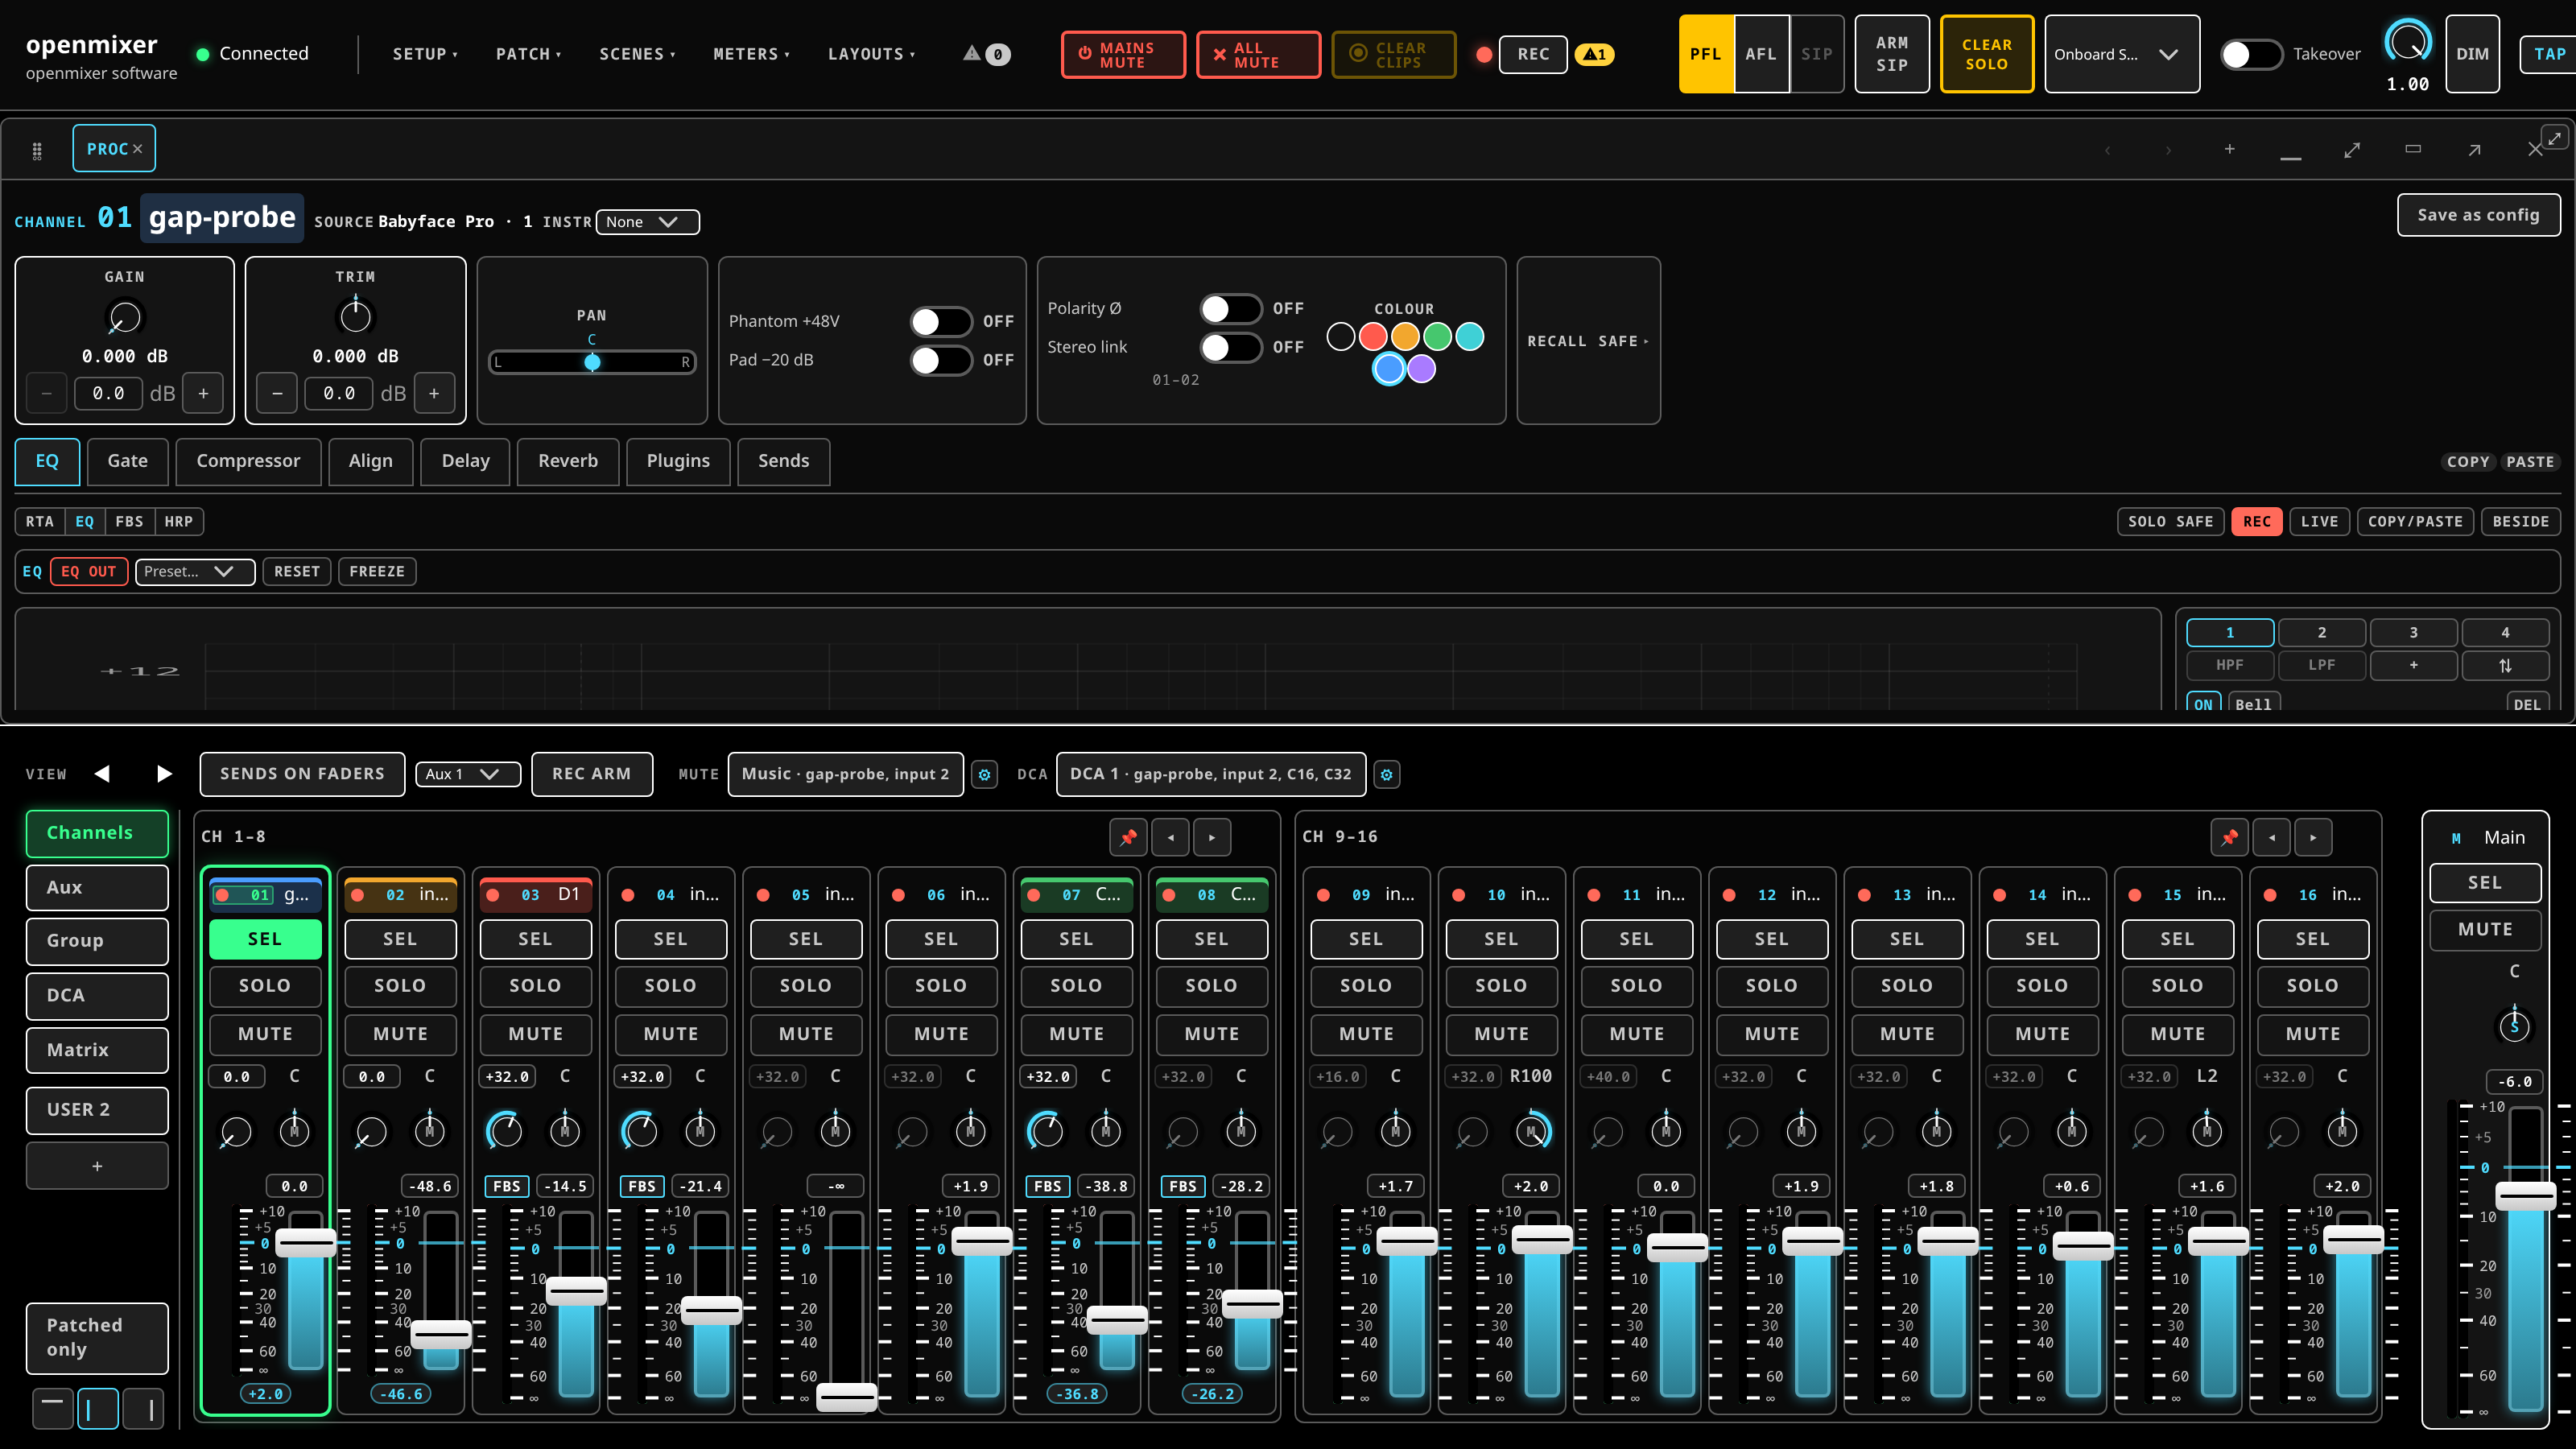 The surface: the header on top, the work zone in the middle, the fader bay across the bottom.
The header
Carries the openmixer mark, the console model, the connection indicator, a channel count, the console profile, personality and theme pickers, a Save session button, and two panic buttons — MAINS MUTE and ALL MUTE — which kill sound instantly and do not ask for confirmation.
The connection indicator is the first thing to read when something seems wrong. It shows Connecting, Connected, Demo (offline) or Disconnected.
 The header: the console menus, the connection indicator, the panic buttons, and the cue and monitor block.
Demo (offline) means the browser could not reach a server and is drawing a simulated board. Every control works and nothing touches audio. It is a good way to learn the desk and a bad surprise mid-show — see the web UI cannot reach the server.
Beside the emergency buttons sits the always-visible cue and monitor block. It is console-wide state, reachable from any bank; see cue, solo and the monitor.
The console menus
On the left of the header, sharing its line, are the console menus: Setup, Patch, Scenes, Meters, Layouts and Help. One opens at a time; a click elsewhere or the Escape key closes it.
| Menu | What it holds |
|---|---|
| Setup | The between-songs surfaces: allocation, adapters, controllers, discovery, stageboxes, the clock, preferences. |
| Patch | The routing views: the patchbay, the crosspoint matrix, the graph and the source layer. |
| Scenes | Sessions and scenes — saving, recalling and storing the desk. |
| Meters | The meter bridge, the analyser, and the telemetry and performance readouts. |
| Layouts | Reset the workspace to its default, save it, and add any panel to the work zone. |
| Help | The manual, the plugin catalogue, the keyboard shortcuts, the FAQ and About. |
Help
Help is the last menu and it is always there — it does not disappear when the console is offline, which is when you are most likely to want it.
| Item | What it opens |
|---|---|
| Manual | This manual, from the console's own copy, in a panel over the desk. |
| Plugin catalog | The plugin catalogue — every measured plugin, by family. |
| Keyboard shortcuts | The keyboard reference. |
| Frequently asked questions | The FAQ on the public website. This one needs the internet. |
| About | What the console reports about itself: its build, its model, whether the surface is linked to it and whether the plugin host is up. |
The first three open a panel over the desk, not a new page: the meters keep moving, the fader bay stays where it is, and the panic buttons still work while you read. Close the panel with its ✕ or with Escape. Every page in the panel also carries Open in a new tab, for when you want the manual on its own screen.
About shows the build the console is running, asked of the console itself. Where the
console does not report one it says unidentified build rather than guess: a version the
browser made up would describe the wrong thing.
The Help menu also carries a one-line reminder of the other way to get help, which is usually the faster one: see getting help on a control below.
The channel view and the layout chips
The upper part of the screen shows whichever module you have open. It starts empty with "Select a strip below to open its channel view."
Above it is a row of layout chips — what most consoles would call tabs. Each chip swaps the module or modules shown in the channel view. Beside them sit the session controls and a density control (compact / normal / comfortable, plus auto), which sets how much the surface packs into the space available.
The built-in chips:
| Chip | What it holds |
|---|---|
| Processing | The channel strip: trim, filters, gate, EQ, dynamics, inserts. See the channel strip. |
| Plugin rack | The ordered insert chain for the selected channel and the selected output. |
| Plugin editor | The generated editor for one plugin. |
| Sends | Per-channel sends, plus the bus and mute-group masters. |
| Routing | The selected strip's MAIN on/off and sub-group assigns. |
| Matrix + outputs | The crosspoint matrix and the per-output insert chains. |
| Meter bridge | Full metering with peak-hold, clip and loudness. |
| Patchbay | The crosspoint routing list. |
| Graph | The same routing as a node canvas. |
| Source layer | Named inputs with head-amp control and direct paths. |
Any module — or a whole layout — can be popped into its own browser window, so the fader wall can live on the main display with a plugin editor on a second screen. Each window is another client of the same server. The header's Layouts menu adds a panel beyond this built-in set to the current work zone — the talkback generators among them. Arranging, splitting and saving all of that is layouts, banks and the work zone; every menu item, one line each, is the console menus.
Console size, adapters, discovery, sessions and the other between-songs settings are not chips: they live in the reserved top-right config zone, reached from the header's Setup, Scenes and Meters menus.
The fader bay
The bay is the wall of channel strips and the heart of the desk.
Strips are grouped in banks of eight. The bay shows one set of the console at a time and cycles through them:
CH (input channels) → AUX (aux masters) → BUS (group and subgroup masters) → DCA → MTX (matrix).
The Main fader is pinned to the far right, always in view, outside the paging.
Within a bank you can pin a strip, page left and right (, and .), collapse the bay to
a thin spine, and drag strips to reorder them.
Console size
The console starts at 16:8 — sixteen inputs, eight buses — which is also the minimum, and scales up through presets to 96:32. Pick the size under the header's Setup menu, in Allocation.
When a stagebox is detected the console sizes itself to what the box actually offers; the 16:8 preset is the fallback when there is nothing to detect. Whichever happened is recorded, so a console that came up smaller than you expected has an answer in the log.
Getting help on a control
Most controls can explain themselves. On a touchscreen each one carries a small information mark in one of its corners — the circled i. Tap it and a card opens with what the control does, its units and its range, and an Open manual button that jumps straight to the section of this manual about it. It is an i, not a question mark, on purpose: nothing is wrong and nothing is being asked of you, there is simply more to know about that control.
The mark sits in whichever corner is free, so it never lands on the control itself: top right on most, top left on the gate and compressor rows, whose right-hand end is the value's − and + steppers. Tapping the mark never moves the control under it, and tapping the control never opens the card.
You do not have to hit the mark. Press and hold anywhere on the control for about half a second and the same card opens — which is also how you reach it on the few controls with no room for a mark at all, such as a fader cap or the output-leg destination in the patchbay. Holding a control never changes its value: if your finger moves, the desk reads it as a normal adjustment and no card appears.
With a mouse there is no mark, because a mouse does not need one: hover a control for the same explanation as a tooltip, and right-click it for the card with the manual link.
Where do I find X
A few things are not where you would first look:
- The crosspoint matrix is under Matrix + outputs, not a chip of its own.
- DCA membership is assigned on the fader bay: page to the DCA bank, press a DCA's SEL, and the channel strips' SEL keys become IN/OUT for that DCA. The ⚙ beside the DCA chips opens the manager, whose member chips do the same job faster for a whole section.
- Mute-group membership is assigned in the master bay: open the Sends chip and use the Bus masters panel's Mute Groups section, or the ⚙ beside the mute-group chips.
- Sends-on-faders is a button in the fader bay (and the
Fkey), not a separate view. - Feedback suppression is a sub-tab of the EQ tab in the channel strip, not a console-wide panel.
- The routing patchbay (a crosspoint list) and the Graph (a node canvas) are two views of the same routing.
- Cue and monitor controls are in the header block, not in a chip.
- Console size, adapters, discovery and sessions live in the config zone under the header's Setup menu, not a chip — see the Setup panels.
- Setup ▸ Patchbay is the exclusive-control switch, not the routing patchbay. The routing patchbay is under Patch.
- The clock — both the console's rate and a stagebox wire's — is Setup ▸ Clock; see the clock.
- Recording and virtual soundcheck are Layouts ▸ Record, plus the REC button in the header; see recording.
- The manual, the plugin catalogue, the shortcuts and the FAQ are under the header's Help menu, and the first three open over the desk rather than replacing it.