The clock
There are two clocks on this desk and they are not the same thing.
- The graph clock paces the mixer itself: the sample rate everything inside the console runs at, and the buffer size that decides how much latency that costs.
- The REAC clock paces a stagebox wire. Each REAC port is a segment with its own pace, and a box on that segment follows it.
They are independent. A stagebox running at 96 kHz on a console running at 192 kHz is a normal, working rig: the bridge converts between them. That is why the panel has two tabs.
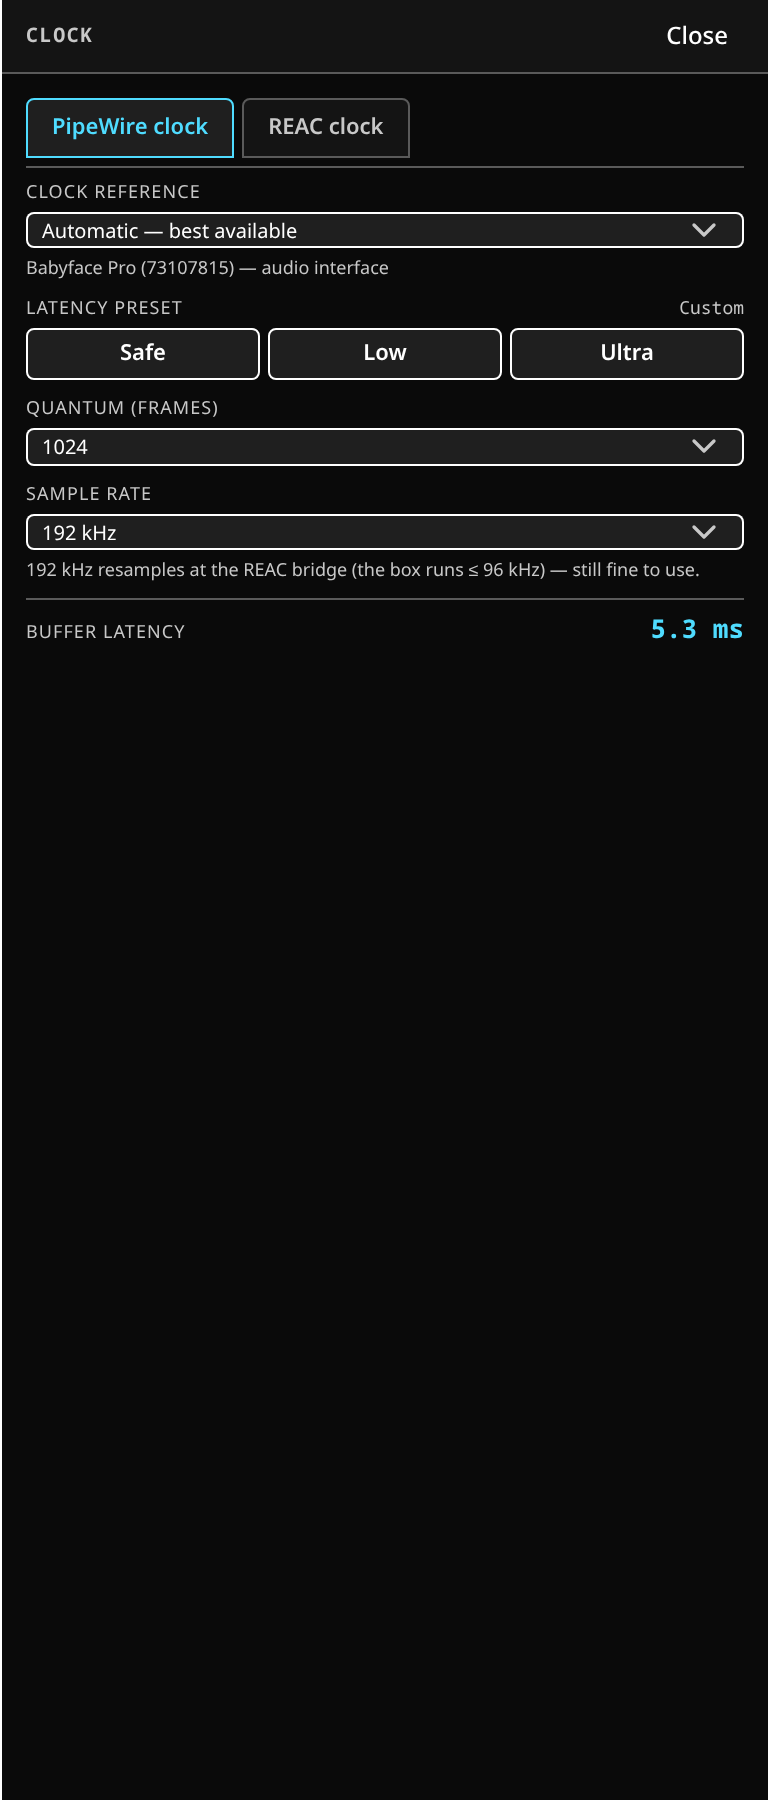 The clock panel, PipeWire tab: the reference, the latency presets, the quantum and rate, and the buffer latency those two come to.
Setup ▸ Clock, in the config zone.
The PipeWire tab — the graph clock
Latency presets
Three named pairs of buffer size and rate, safest first:
| Preset | Buffer | Rate |
|---|---|---|
| Safe | 256 frames | 48 kHz |
| Low | 128 frames | 96 kHz |
| Ultra | 64 frames | 96 kHz |
One press sets both. Safe is the between-songs setting; Ultra is the tightest the desk offers. Buffer latency at the bottom of the tab is what the pair actually costs, in milliseconds, so the trade is a number rather than a feeling. Set the quantum or the rate to anything that is not one of the three and the preset row reads Custom.
Quantum and sample rate
Set separately when a preset is not what you want. The rate menu offers what the active output card actually supports, read from the card — not a list the desk imagines. The rate applies live: nothing restarts and the show keeps running.
The rate shown is always the rate the driver is running, not the one you asked for. In the rare case a driver refuses a pick, the panel says so — driver kept X kHz — instead of displaying a number that is not true.
The clock reference
The reference is the device whose clock the console derives its pace from. The menu lists what is available, each entry graded:
| Grade | What it is |
|---|---|
| audio interface | A real interface. The best kind of reference. |
| onboard codec | The machine's built-in audio. Usable. |
| display audio | A clock that comes out of a monitor or a graphics card. Not a reference. |
| software driver | Not hardware at all. Not a reference. |
The menu opens on Automatic — best available, with the device it settled on named underneath. The console picks the highest-graded one by itself and says why — "an audio interface with no known disqualifier — designate it explicitly if you know your clock". Pick one from the menu to designate it, which stops the ranking from changing its mind later. The entry that is currently pacing the graph is marked (driving the graph).
If nothing worth following is present you can still own the pace, by switching on free-running. That is an emergency configuration and the panel says so: every box locks to a rhythm the console invented, with nothing outside checking it.
Clock pace: Master or Follower
| Master | openmixer owns the pace. Every box locks to our grid. |
| Follower | Another device owns the pace. openmixer answers on its grid. |
Master is only offered when there is a reference worth propagating, or when you have turned on the free-running override.
As a Follower the tab stops offering a rate — you are being told the number, not choosing it — and reports instead who owns the pace, the locked rate, and whether the lock is real or the pace is free-running.
Any clock warning the console raises appears at the bottom of this tab.
The REAC tab — the wire
The REAC tab lists the segments: one per REAC port on this machine. A segment is labelled by its port — REAC A, REAC B — and by the box on it, if there is one.
Reading a segment card
| What you see | What it means |
|---|---|
| REAC A · box name | The port, and the box that is on it. |
| A badge: Master clock | This console is mastering that wire. |
| A badge: Slave clock to … | Something else is mastering it, and the card shows that device's address. |
| A badge: Ready to drive | Nothing is mastering the wire yet. |
| 96.0 kHz | The rate the wire is running at right now. |
| Pace: … | Where the timing comes from. See the ladder below. |
Show details opens a popover with the box's model, its firmware version, the master's address and its hardware identification. It is a popover on purpose: reading it does not move the card, so nothing shifts under your finger mid-show.
The pace ladder
Pace names what is actually timing the wire, best first:
| Pace | What it means |
|---|---|
| hardware clock | A real hardware clock on the network interface. The best answer. |
| graph clock, as a reference | The console's own graph clock, used as the reference the wire is paced from. |
| the box's own slope | The rate is being recovered from the box's own arrival timing. |
| the foreign master | Another desk is mastering this segment and we are following it. |
| internal clock | Free-running: the host's own clock, with nothing outside it. |
It is reported, never hidden. Internal clock is a working state, not a fault — it is what you get with no hardware timestamping on the interface — but it is worth knowing that is where the timing is coming from.
Setting a segment's rate
REAC runs at 44.1, 48 or 96 kHz. That is the wire, not the console: the graph can be at 192 kHz with a segment at 96 and the bridge converts.
Pick the rate and press Apply. It is a two-press control — the first press arms it, the second fires — because of what it costs:
Changing the rate re-establishes the segment on the wire: the box's inputs and outputs go silent for about six seconds while it re-locks. On a box carrying the PA return, that is the whole rig.
While it re-locks the card says Re-locking… and the rate control waits.
A few things the card will tell you rather than letting you guess:
- A slave segment has no rate to set. It follows the foreign master's pace, and the card says so instead of offering a control that would do nothing.
- Wire x kHz · desired y kHz means the pace you asked for and the pace on the wire disagree. A Re-assert button pushes it again.
- pending — the write is in flight. refused: reason — it was not accepted, with the reason.
Capture and playback always follow one wire rate together. A segment whose inputs and outputs claimed different rates would be a fault, not a configuration.
The segment's role
What the console intends to be on that wire:
| Role | Meaning |
|---|---|
| Master (mixer) | We are the desk. We master the segment and own its clock. |
| Slave (recorder) | We follow whatever masters the wire — a desk, or a box switched to master — and take its clock. |
| Auto | Listen first, then take the end the wire leaves open: master a vacant wire with boxes on it, follow a master that is already there. |
On a Roland desk this is one switch for the whole console. Here it is per segment: one port can master a stagebox while another follows a desk.
A role change also re-establishes the segment, so it is the same two-press Apply with the same warning.
Beside the menu is the role state — what the wire actually did, as opposed to what you asked for:
| State | Meaning |
|---|---|
| Applied | It took. |
| Re-establishing… | In progress. |
| Hunting for a desk… | You asked to record and nothing is mastering yet. |
| Not reported | This console's engine does not report role state, so no conflict can be shown here. |
When a role is refused
REAC allows exactly one master per segment, so the console refuses rather than fighting. Each refusal names the remedy:
- You asked to be the mixer, but a desk is already mastering this segment. The console is holding and has asserted nothing on the wire. Switch to Recorder, or take the other desk off.
- A stagebox on this segment has its REAC Mode switch on M (master). Nothing on the wire will fix this. Set the switch to S and power-cycle the box.
- Something is mastering this segment and the console cannot tell what it is. Check what else is plugged into that wire.
- You asked to record, but nothing is mastering this segment. The role was asserted and the console is hunting; until a desk appears there is nothing to record.
- A box is on this segment but has not joined. It only connects when its link comes up, so waiting will not help — unplug and replug the cable at the box.
Where the conflict has a one-gesture answer, the card offers it as a Switch to role button.
Which rate should I run?
- The graph at the highest rate your interface and your plugin load are comfortable at. The desk runs happily at 192 kHz.
- A REAC segment at 96 kHz unless you have a reason. That is the top of what REAC carries.
- Matching them avoids a conversion at the bridge. When they differ the rate picker says so in one line — 192 kHz resamples at the REAC bridge (the box runs ≤ 96 kHz) — still fine to use — and offers to align the graph. It is advice, never a block: running converted on purpose is allowed and is what this rig does.
Related
- Metering and latency — what the buffer size costs, measured.
- Head-amp control — the boxes on those segments.
- The console menus — where the panel lives.