Layouts, banks and the work zone
The screen has three regions and they are arranged separately: the header across the top, the work zone in the middle, and the fader bay across the bottom. This page is about arranging them.
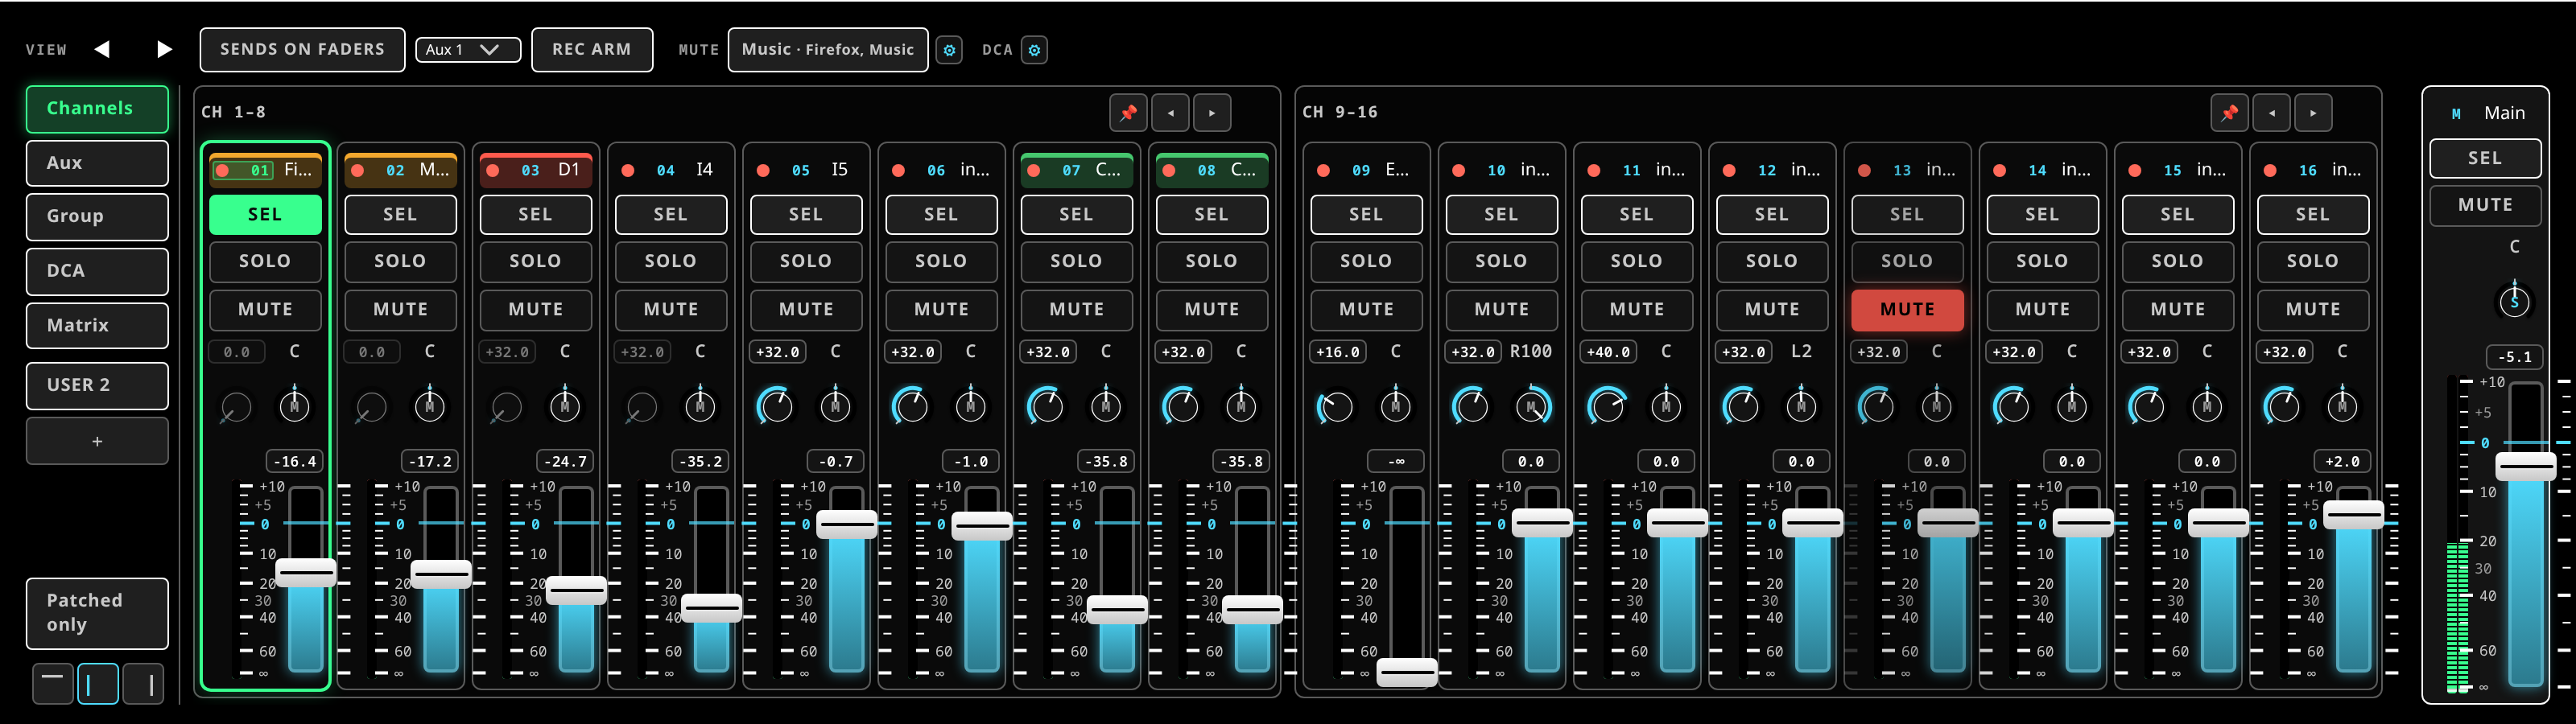 The fader bay: layer tabs across the top, banks of eight below, MAIN pinned outside the paging.
The work zone
The work zone holds panels. Every panel is one of the console's own modules — Processing, Sends, Patchbay, Meter bridge and the rest — and the Layouts menu lists all of them under its divider. Picking one adds it to the arrangement you already have; it does not replace it.
A panel can be split off, resized at its gutter, grouped with others into a tab strip, minimised, maximised, floated over the rest, or closed. Drag a panel's titlebar onto another panel to tab them together, or onto an edge to split.
The Layouts panel lists every saved arrangement as a chip; the lit one is active, press another to switch, and a shipped arrangement is tagged preset.
Two menu items manage the whole arrangement:
- Reset to default puts the work zone back to the shipped arrangement.
- Save config… freezes what you have as a named layout.
Those two are not the same kind of thing, and the difference matters:
The arrangement is per window. It lives in this browser and follows this screen. A phone held at the stage and the screen at front of house are entitled to show the same show arranged differently, and the desk does not push one onto the other. Reload and you come back to the arrangement you left.
A saved layout rides the session. Save config… names the arrangement and stores it with the show, so it is there on every device that opens that session.
The shipped layouts
Ten of them, each a starting point rather than a rule:
| Layout | What it opens with |
|---|---|
| Processing | The channel view, full width. |
| Plugin rack | The insert chain, full width. |
| Plugin editor | One plugin's generated controls. |
| Sends | Per-channel sends beside the bus masters. |
| Routing | The MAIN and sub-group assigns beside the bus masters. |
| Matrix + outputs | The crosspoint matrix beside the output insert chains. |
| Meter bridge | Metering, full width. |
| Patchbay | The routing patchbay, full width. |
| Graph | The node canvas, full width. |
| Source layer | Named inputs and their head-amps, full width. |
Giving the work zone the bay's half
The ⤢ button hands the fader bay's half of the screen to the work zone, and gives it back when you press it again. Use it whenever a panel is too short to read — an EQ curve in half the height is a curve you cannot judge — and press it again to get the faders back.
A panel on a second screen
Any layout can be popped out into its own browser window, so the fader wall lives on the main display and a plugin editor sits on a second screen. Each window is another client of the same console: everything is live in both, and each window keeps its own arrangement.
The fader bay
Strips are grouped in banks of eight, because eight is what moves together on a hardware desk and the habit is worth keeping.
The bay shows one layer at a time, chosen from the tabs beside the faders:
Channels · Aux · Group · DCA · Matrix
Picking a layer jumps the bay to it. It does not fence the paging: the ◀ ▶ arrows
step through every bank of every layer as one continuous, wrapping sequence — channels,
then buses, then DCAs, then matrix, then round again. The , and . keys do the same.
You can also roll the mouse wheel over the bank rail to step banks, in either direction. The gesture stays out of the way of the controls it rolls over: a wheel on a fader still trims that fader, and only the space between the controls steps banks. One flick of a trackpad is one bank, not twenty.
Within the bay:
- Pin a bank and the paging flows past it — it stays where it is while the rest cycle.
- Collapse a bank to a thin labelled spine, and click it to bring it back.
- MAIN is pinned to the far right, always in view, outside the paging entirely.
- Hide unpatched drops input channels with nothing patched into them, so a 64-channel console shows the ten strips a small gig actually uses.
- The layer menu itself can sit across the top or down either edge of the bay.
USER pages
A USER page is a bay layer you build yourself: an ordered list of slots, each one any strip on the console — an input, an aux master, a group, a DCA, a matrix, MAIN — or a deliberate blank, the gap a hardware desk uses to separate one part of a band from another.
USER pages ride the tabs beside Channels / Aux / Group / DCA / Matrix.
- Tap a USER tab to show that page in the bay.
- Long-press the tab (or press EDIT PAGE) to open the page editor.
- + adds a page.
The editor is built for a finger: pick a slot, pick what goes in it, drag to reorder, leave gaps where you want gaps.
A USER page belongs to the desk, not to this screen. Build one at front of house and it is there on the tablet at the stage and on the laptop in the office, because it is part of the show. That is the opposite of the work-zone arrangement above, and deliberately so: a page is which strips matter tonight, which is a fact about the gig; an arrangement is how big this screen is, which is not.
What you can keep locally is a page profile — a named snapshot of the whole set of USER pages together. Save the festival set, load the theatre set, switch back. Profiles live in this browser and loading one moves the desk onto it.
Density
Density decides how much the surface packs into the space it has. Three tiers, plus auto:
| Tier | Fader width | Use it when |
|---|---|---|
| compact | 80 px | A tablet, a laptop, or any time you want the most faders on screen. |
| normal | 100 px | The everyday setting. |
| comfortable | 116 px | A big screen, or fingers on a touchscreen at arm's length. |
Auto picks for you: a touchscreen narrower than about 1100 px goes to compact; otherwise it takes the widest tier that still keeps at least two banks — sixteen faders — on the wall.
The density control is in the header's display settings and in Setup ▸ Preferences. It is an operator preference, so it rides the session and reaches every window you have open.
What happens when the faders do not fit
By default, nothing gets narrower. The strips keep their width and the surplus banks page — which is how a hardware desk behaves, and means a fader is always in the same place under your hand.
The other behaviour is available and is an explicit opt-in: narrow on overflow shrinks the tier until every bank of the current layer fits at once, and never widens past the tier you chose. Turn it on when seeing the whole layer matters more than the strips staying the size you set.
The bay never shows more than four cycling banks side by side, whatever the width.
A narrow screen
At compact density on a small screen the config zone stops being a column and comes in over the right-hand edge with a dimmed backdrop behind it. Tap the backdrop to send it away. While it is up it covers the header, so close it before reaching for a menu.
The dock chrome compresses along with the strips, and panel tabs swap their titles for
short console abbreviations — FDR, PROC, RACK, MTX, RTA — so a tab strip of six
panels still reads at a glance.
Related
- The console menus — the Layouts menu item by item.
- The surface — what each region is for.
- Keyboard reference — paging and layer shortcuts.