EQ and dynamics
The interactive EQ
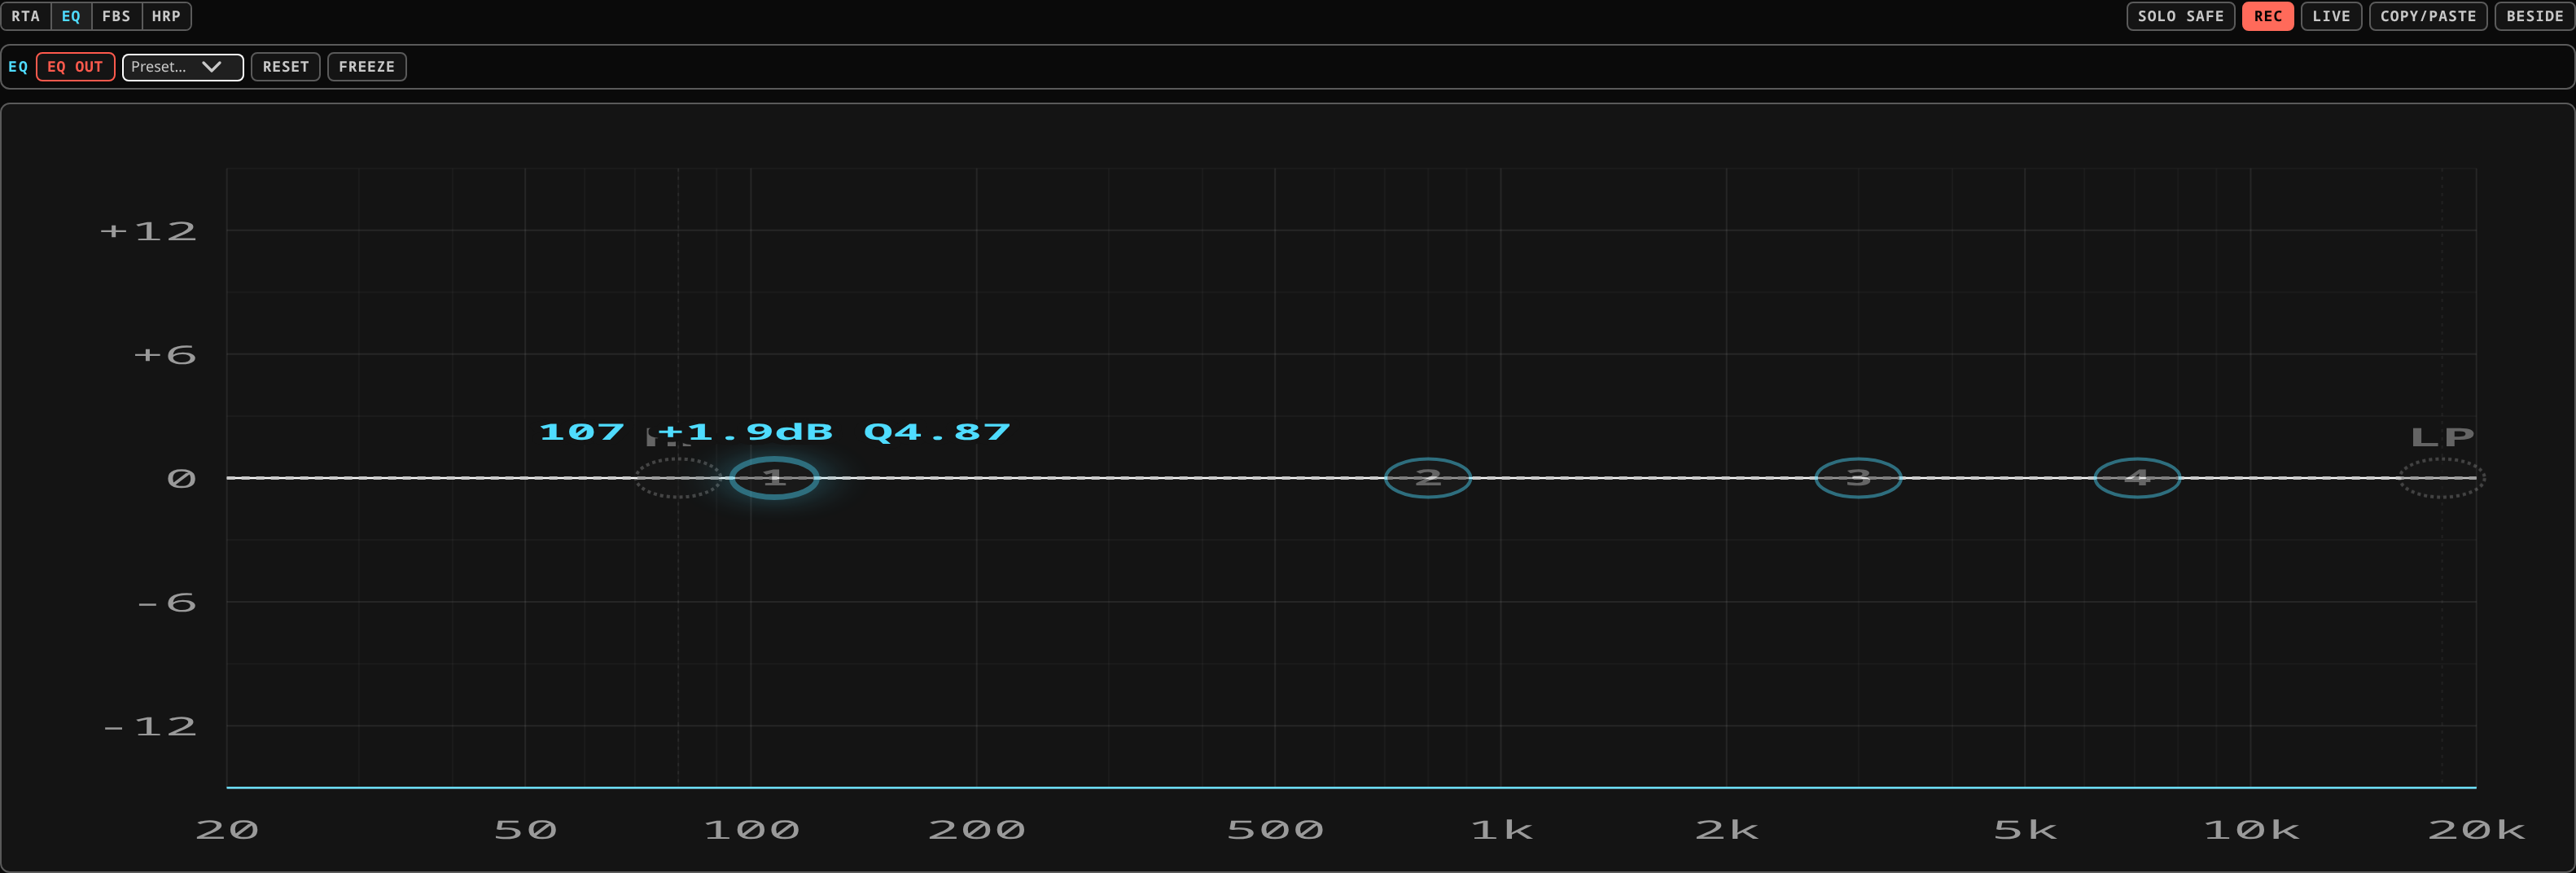 The interactive EQ: drag a band on the curve, or use the encoder bank beside it.
The EQ tab draws the channel's frequency response as one curve and lets you shape it by hand. It is touch-first:
- drag a band point left and right for frequency, up and down for gain;
- roll the wheel over a band point to tighten or widen its Q;
- double-click the open curve to add a band at that frequency; select a band and press Delete (or Backspace) to remove it;
- the high-pass and low-pass points sit at each end of the same curve — drag them to set the cutoff, tap one to switch the filter on or off.
A live readout under the curve shows each band's exact frequency, gain and Q as you drag, and an encoder bank below does the same job for fine numeric work. The curve and the encoders edit one shared state, so moving either moves the other.
Every control is keyboard-reachable: arrows nudge, Enter toggles a filter.
The curve is drawn from what is actually shaping the signal — the EQ in the channel's EQ stage plus the built-in high-pass and low-pass — not from a generic picture.
This is a dynamic-band EQ, not a fixed-band one: a channel opens with a handful of starter bands, and from there you add, drag and remove bands freely — bands sort by frequency and renumber as you go, so there is no "band 3" that stays band 3. That differs from a desk with a fixed set of named bands (Bass/LoMid/HiMid/Treble and the like) in the way that matters on a real show: no band sits unused because the mix didn't need it, no problem frequency goes untreated because every named slot is already spoken for, and each band is a decision the operator made, not a slot the desk handed out. A restrictive console profile may offer a different EQ character (a fixed musical set, for instance), and will say so by simply not presenting the dynamic controls.
What this stage guarantees: Every sample this stage produces is a finite number — never NaN, never infinite. This stage's internal state never settles into denormal numbers that could stall the audio thread. Bypassed, this stage's output is identical to its input, sample for sample.
The band chips
Under the graph, a row of chips picks what the encoders edit:
- one chip per parametric band, dimmed while the band is off, and marked when it is a notch the feedback suppressor planted;
- HPF and LPF for the two filters;
- + adds a band, greyed when the EQ has no room for another;
- ⇅ sorts the bands by frequency, which renumbers them.
With a band selected, DEL at the end of its row removes it.
Gate
The Gate tab has its own live curve and the usual controls: threshold, range, attack, hold and release.
The gate sits before the EQ in the default signal order, so it keys off the raw input rather than off whatever the EQ has just done. Some console profiles enforce gate-before-compressor; the openmixer profile does not force an order.
Keyed detection
By default the gate's detector listens to the same signal it gates. The Key block below the gate controls lets it listen to something else instead:
- Key source picks what the detector hears — another channel, or Self. The channel's own fader always carries its own full-range audio; only what the detector listens to changes.
- Key HP / Key LP filter the detector only, never the audio itself. Set with both edges together, they make a band: a Voice band button sets them to a vocal's fundamental-and-presence window (120 Hz high-pass, 8 kHz low-pass) in one tap — useful on a self-keyed mic so it opens on its own voice and ignores bleed sitting outside that band. Left at 0, an edge is off.
- Key listen feeds the filtered detector to the cue bus, the same way PFL lets you hear a channel pre-fader, so you can hear exactly what the gate is reacting to before trusting it.
Typical uses: a bass channel keyed by the kick so the low end stays tight to the kick's own timing; a snare-bottom mic keyed by the snare-top mic so hi-hat bleed does not open it; a vocal mic self-keyed through the voice band so a neighbouring vocalist's spill does not open it.
What this stage guarantees: Every sample this stage produces is a finite number — never NaN, never infinite. This stage's internal state never settles into denormal numbers that could stall the audio thread. Bypassed, this stage's output is identical to its input, sample for sample. This stage never adds gain — its output level never exceeds what came in. At its default settings, this stage passes audio through unchanged in level.
Compressor
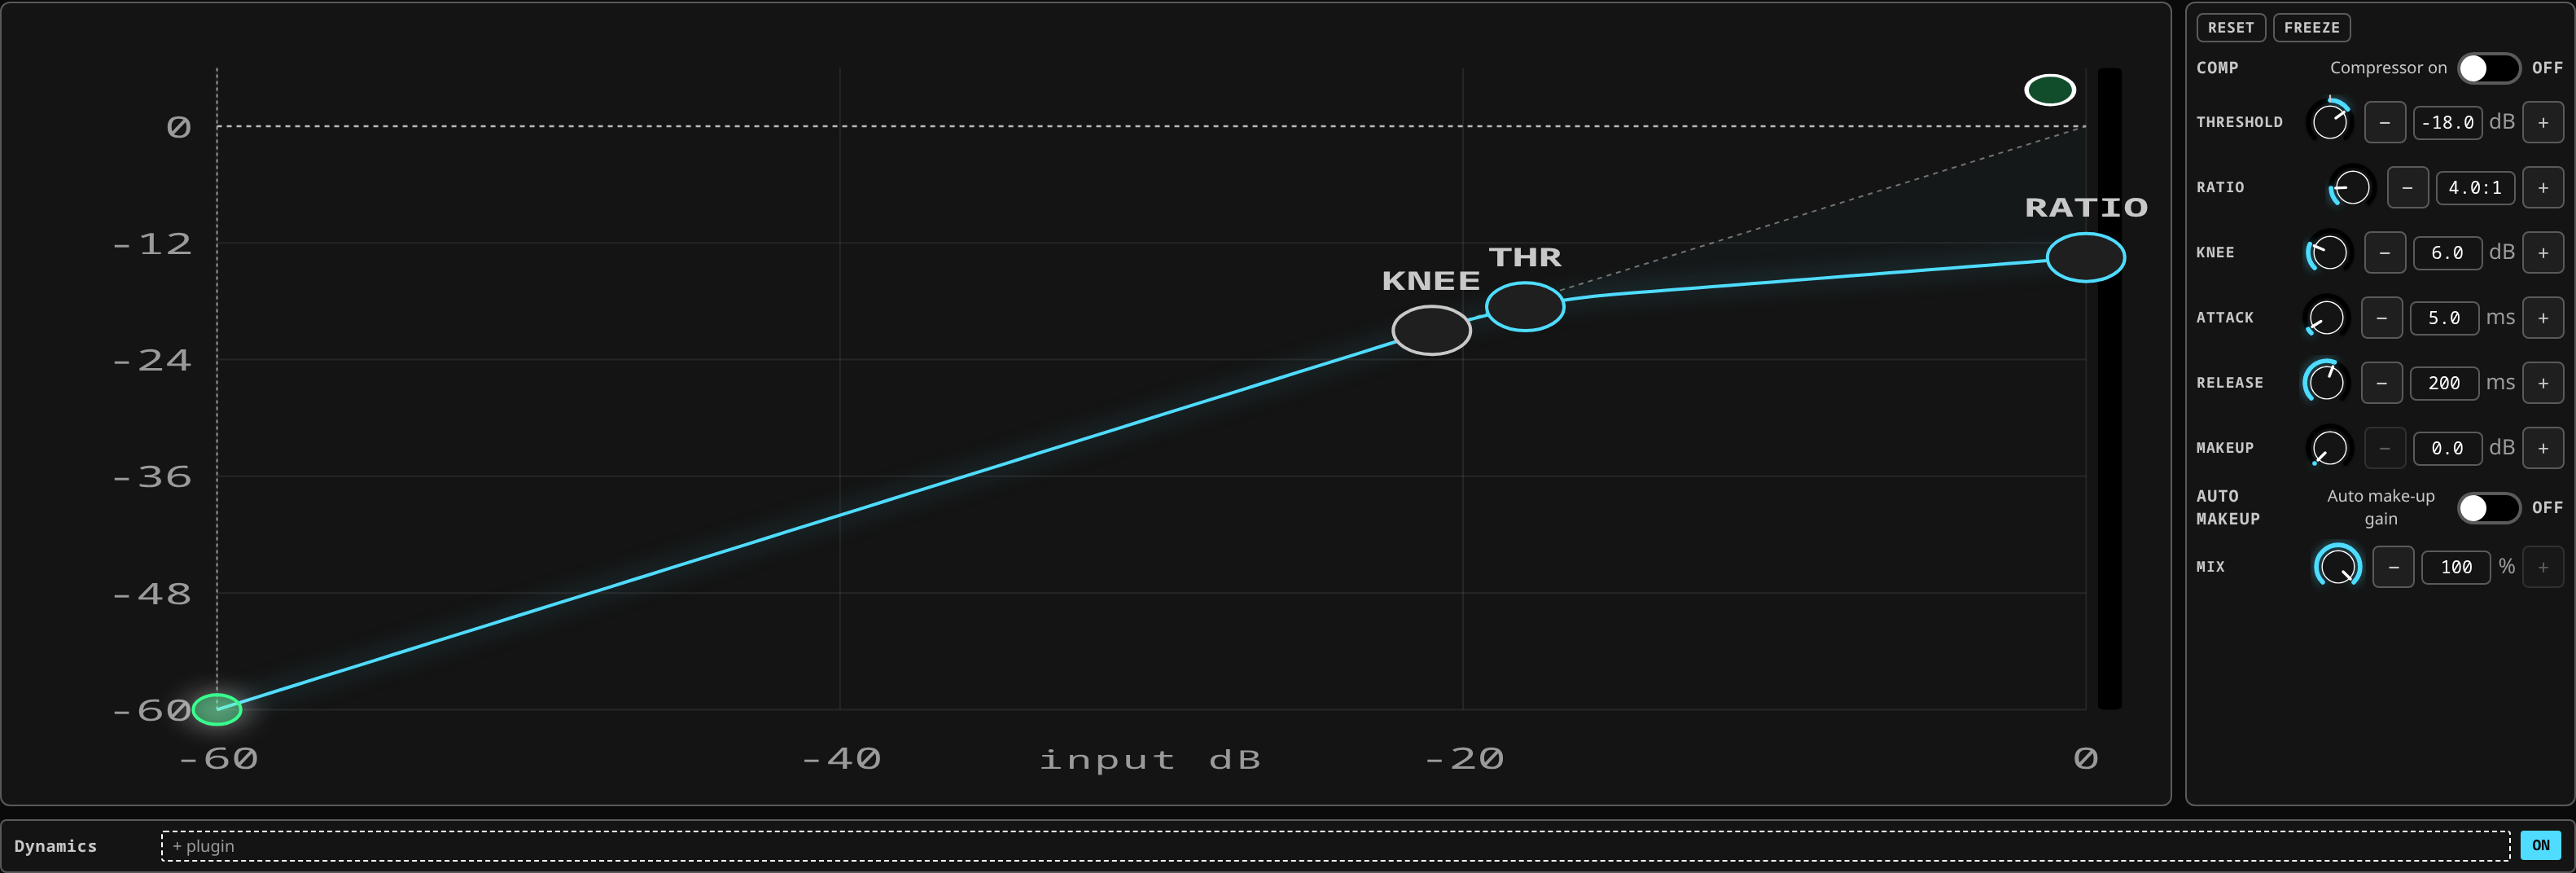 The compressor: the transfer curve, with threshold, ratio and the live gain-reduction readouts beside it.
The Compressor tab likewise draws its transfer curve: threshold, ratio, knee, attack, release and make-up gain, with the curve showing the result as you move them.
The default profile makes several dynamics types available in the two dynamics stages — gate, expander, compressor, limiter, ducker, de-esser and multiband compressor. A stage takes one of them.
What this stage guarantees: Every sample this stage produces is a finite number — never NaN, never infinite. This stage's internal state never settles into denormal numbers that could stall the audio thread. Bypassed, this stage's output is identical to its input, sample for sample. Output level never exceeds input level by more than the makeup gain you set — this bounds level, never a sample's peak. At its default settings, this stage passes audio through unchanged in level.
Native FX
The channel's own send-type effects — Delay and Reverb today, and chorus or flanger when those land — share one chip, Native FX, in the processing view's channel block beside Analysis. It is built the same way: one row per effect, always listed whether it is on or off, each showing its name and its own on/off switch. Hover a name to see its current settings.
| Control | What it does |
|---|---|
| An effect's name | Opens that effect's controls. |
| An effect's switch | Turns that effect on or off without leaving what you are looking at. |
An effect that is on also appears in the channel's processing chain as a stage of its own, where you drag it to a new place like any other stage; switched off, it leaves the chain but keeps its place in the processing order. This chip is a stand-in until a better way of laying out the native effects arrives.
Delay
The Delay tab is the channel's own effect delay — the musical one, not an alignment.
| Control | What it does |
|---|---|
| On | In or out. |
| Time | Up to 2000 ms, in milliseconds. |
| Sync | Follow the console's tempo instead of a figure in milliseconds. |
| Division | With sync on, the note the delay lands on — quarter, eighth, dotted eighth, eighth triplet. The resolved milliseconds are shown live beside it. |
| Feedback | How much of the output goes back in. It stops short of 1, so it cannot run away. |
| Mix | Dry to wet. |
| Tone | Darkens the repeats. |
| Ping-pong | Alternates the repeats between the two sides. |
The console's tempo is set from the header's tap-tempo control, so a delay on sync follows the song rather than a number you worked out once.
The Delay tab is offered where the console has native effects and the console profile ships a delay section. A profile modelled on a desk that has no delay strip does not show it.
What this stage guarantees: Every sample this stage produces is a finite number — never NaN, never infinite. Bypassed, this stage's output is identical to its input, sample for sample. The output is an exact copy of the input, delayed by the reported number of samples.
Reverb
The Reverb tab is the channel's own reverb. Five algorithms — room, plate, hall, reverse and gated — share one set of controls.
| Control | What it does |
|---|---|
| On | In or out. |
| Algorithm | Room, plate, hall, reverse or gated. |
| Size | How big the space is. |
| Damping | How fast the top end dies away in it. The same setting is the same filter whatever rate the desk is clocked at, so a session moved between a 44.1 or 48 kHz stage box and the desk's 96 kHz keeps its sound. |
| Pre-delay | Up to 100 ms of gap before the tail starts. A little of it separates the reverb from the source and keeps words intelligible. |
| Width | How wide the tail is. |
| Mix | Dry to wet. |
| Low cut / High cut | Keep the tail out of the bottom and the top of the mix. |
Three things about these reverbs are worth knowing before you reach for them.
Damping means one filter, at any clock. Set damping where you want it and it stays there: the tail is the same length and the same brightness at 44.1, 48, 96 and 192 kHz. A room does not get brighter or longer because a stage box brought a different clock with it.
The plate does not ring. Its tank drifts slowly — about a second per cycle, too slow to hear as movement — and that is what keeps the end of a plate's tail from settling into the faint metallic flutter plates are known for. A plate's tail runs about as long as its size says; if you want more of it, turn Size up.
A gated reverb re-opens without a click. Hit it again while the previous tail is still closing and the gate opens over a millisecond and a half instead of instantly, so the second hit arrives clean. The bite on a snare is unchanged — a millisecond and a half is well inside the stick.
A per-channel reverb is convenient and it is not the only way: an aux feeding a reverb on a bus gives one tail that several channels share, which is usually what a mix wants. See sends, buses, groups and DCAs.
What this stage guarantees: Every sample this stage produces is a finite number — never NaN, never infinite. This stage's internal state never settles into denormal numbers that could stall the audio thread. Bypassed, this stage's output is identical to its input, sample for sample. The reverb tail always decays to silence — it never sustains or grows on its own.
Drive
The Drive tab is the channel's saturator — the one control on the strip that is there to add colour rather than to correct something. It sits after the compressor and before the delay and reverb, so what it colours is the channel as you have already shaped it.
The picture beside the controls is the curve the desk is running. Input along the bottom, output up the side, and the straight diagonal is what the channel would do if the stage did nothing. The further the curve leaves that line, the harder the signal is being squeezed — turn Drive up and you watch it bend. A curve that has stopped being a straight line is a sound that has stopped being clean, which is the whole point of the section.
The picture draws the shape, the mix and the trim. It does not draw auto gain, because that is measured from the signal as it plays rather than being a property of the curve, and it does not draw band or HF roll-off, because those are choices about frequency and this picture has no frequency axis — this chapter is where that is written down, not a line under the curve: move Character or Band and watch the picture stay still, and it will be obvious why.
The ? button in the DRIVE header opens this chapter over the desk, without leaving the mix.
| Control | What it does |
|---|---|
| On | In or out. Off, it costs nothing at all. |
| Curve | The shape of the knee. Soft is the firmest and cleanest, tape is gentler, tube is the widest and richest. Exciter is different: instead of fading between the clean and driven sounds it ADDS the driven band on top of the whole channel, which is what an enhancer does. |
| Drive | How hard the signal is pushed into the curve. At 0 dB it barely does anything; turn it up until you hear it. |
| Character | Which harmonics you get. All the way down is the plain curve: odd harmonics only, the hard, edgy kind. Turning it up shifts the signal off centre inside the curve, so the two halves of the wave are treated differently and even harmonics appear — the warm, thick kind. All the way up they lead by a good margin at normal drive settings; push Drive past about 15 dB and the clipping's own odd harmonics take over again whatever this knob says. |
| Even bias bar | Reads Character back as one number: how far up its travel the even-harmonic bias is set, 0 to 100 %. It follows the knob; it is not something you set, and it is not a measurement of what came out — how much even harmonic you actually get depends on how hard you are driving the curve. |
| Band | Which part of the sound is driven. Full is everything, low is below the band frequency, high is above it, and tilt drives the top harder than the bottom without changing the tone. |
| Band (frequency) | Where that split sits. |
| Mix | How much of the driven sound you hear against the clean one. At 0 % the channel passes through exactly as it came in. |
| Trim | Level after the stage, so you can switch it in and out against the same loudness. |
| Auto gain | On by default. The desk measures the level going in and coming out and matches them, so turning Drive up changes the colour and not the loudness. |
| Stereo link | On a stereo channel, one gain path for both sides, so nothing can pull the image off centre. |
| HF roll-off | Off, 12 kHz or 16 kHz. Tames the fizz an exciter can put on top. |
| Oversampling | 1×, 2× or 4×, and 4× is the default. Higher settings run the saturator at a multiple of the console's rate so the harmonics it makes stay where they belong instead of folding back down into the music. Leave it at 4× unless you are short of CPU. |
What the three shapes sound like
Soft is the firmest knee: it holds the level down close to where it was and lets go of the extra harmonics quickly, so it reads as clean loudness — the most "console" of the three. Tape bends earlier and more slowly, so you hear the thickening before you hear the limit. Tube has the widest knee of all: it is audibly working long before anything reaches a ceiling, and it is the richest of the three because its harmonics carry furthest up the series. All three are ODD-symmetric shapes on their own; the Character knob is what puts even harmonics in, on any of them — and it does it the way valve stages do, by sitting the signal off centre on the curve rather than by adding a second kind of distortion. Turned up, it also makes the channel quieter — the curve is flatter away from its centre — and auto gain is what puts that back. If you have switched auto gain off, expect to find the trim.
Exciter is not a fourth knee — it is soft's shape wired differently, added on top of the whole channel instead of fading against it, which is what an enhancer does. It comes up aimed at the top of the spectrum and at a low mix for that reason.
What Band leaves alone. At low and high the half the curve does not see bypasses the stage untouched and is added back exactly as it came in, so setting Mix to 0 gives you back the channel bit for bit whichever band you picked. Tilt is different: it drives the whole signal but tips the balance with a shelf, and then takes the same shelf back out afterwards — so what tilts is how hard each octave hits the knee, not the tone of what comes out.
Why auto gain is measured and not a table. A saturator gets louder as you drive it, and how much louder depends on the material, not only on the setting. The desk therefore measures the level going into the stage and the level coming out of it over the same short window and matches them. Below about −90 dBFS it holds the last figure instead of tracking, because a ratio taken on silence is not a measurement. That is why turning Drive up changes the colour and not the loudness, and why the correction follows a fader move.
It costs a little latency while it is on — 0.75 ms at 4× and 0.50 ms at 2×, and the panel shows the exact number in samples. That is normal for any oversampled processor; it means a channel with Drive on is a fraction of a millisecond behind one without it, which matters if the two are two microphones on the same source. It is zero while the stage is off.
What this stage guarantees: Every sample this stage produces is a finite number — never NaN, never infinite. Bypassed, this stage's output is identical to its input, sample for sample. At its default settings, this stage passes audio through unchanged in level.
Chorus
The Chorus tab thickens a channel by mixing it with copies of itself whose delay is swept slowly up and down — a few milliseconds of wobble that the ear hears as several performers instead of one. It runs after the drive and before the delay, and it arrives switched off.
| Control | What it does |
|---|---|
| On | In or out. Off, it costs nothing at all. |
| Rate | How fast the copies sweep, 0.05 to 8 Hz. Well under 1 Hz is a gentle shimmer; push past about 3 Hz and it stops sounding like a chorus and starts sounding like vibrato. |
| Depth | How far the delay swings above its 10 ms base, 0 to 12 ms. More depth is a wider, more obvious detune. |
| Voices | How many swept copies run at once, spread evenly around the sweep, 1 to 4. More voices is a smoother, denser ensemble. |
| Mix | Dry to wet, 0 to 100 %. |
What this stage guarantees: Every sample this stage produces is a finite number — never NaN, never infinite. Bypassed, this stage's output is identical to its input, sample for sample.
Flanger
The Flanger tab is the jet-plane sweep: one copy of the channel at a very short, moving delay, mixed back with the original so a comb of notches glides up and down the spectrum. It runs after the chorus and before the delay, and it arrives switched off.
| Control | What it does |
|---|---|
| On | In or out. Off, it costs nothing at all. |
| Rate | How fast the sweep travels, 0.05 to 5 Hz. |
| Depth | How far the delay swings above its 0.5 ms base, 0 to 5 ms — how much of the spectrum the notches cross. |
| Feedback | Signed, −0.95 to 0.95. Positive values sharpen the peaks into a metallic ring; negative values hollow the sound out. Near either end it rings hard. |
| Mix | Dry to wet, 0 to 100 %. |
What this stage guarantees: Every sample this stage produces is a finite number — never NaN, never infinite. Bypassed, this stage's output is identical to its input, sample for sample.
De-esser
The De-esser tab turns down the hard "s", "sh" and "t" sounds of a voice — and only while they are there. It listens to the band where sibilance lives, and when that band gets louder than you asked for it pulls it down; the rest of the time it does nothing at all. It sits after the EQ and before the compressor, so the compressor never reacts to an "s" the de-esser has already dealt with.
The GR bar is what it is doing right now. It reads the reduction the engine is actually applying, measured in the stage, and it is drawn against the deepest cut the Range control can make — a full bar is the stage at its floor. While no sibilant is crossing the threshold it sits empty, which is the normal state. If the channel has no measurement it reads —, never a made-up 0.
The ? button in the DE-ESSER header opens this chapter over the desk, without leaving the mix.
| Control | What it does |
|---|---|
| On | In or out. Off, the channel passes through exactly as it came in. |
| Mode | Split cuts only the sibilant band and leaves the rest of the voice alone — the default, and the one to reach for first. Wideband turns the whole channel down while the "s" lasts, the older broadcast behaviour; some operators prefer it on a shouted vocal. |
| Frequency | The centre of the band the de-esser listens to, from 2 kHz to 16 kHz; it comes up at 7 kHz. Sweep it while the singer says "s" and stop where the reduction bites hardest. |
| Width | How wide that band is, in octaves (0.25 to 4, default 1). Narrow catches a single whistle; wide catches a whole spread of hiss. |
| Threshold | The sibilant level, −60 to 0 dB, above which reduction starts. Default −30 dB. |
| Ratio | How hard it bites once the band is over the threshold, 1:1 to 20:1. Default 4:1. |
| Range | The deepest cut it may ever make, −24 to 0 dB, however loud the "s". Default −12 dB. This is what keeps a de-esser from lisping. |
| Attack | How quickly the reduction arrives when an "s" starts, 0.1 to 50 ms. Default 1 ms — sibilance is fast. |
| Release | How quickly the channel recovers after the "s" ends, 5 to 500 ms. Default 60 ms. |
If it does not seem to do anything: turn On on, ask for an "s", and watch the GR bar. Empty bar — the threshold is above the sibilant, or the frequency is off the voice's "s"; lower the threshold or sweep the frequency. Bar pinned full and the voice sounds lispy — raise the threshold or bring Range up towards 0.
What this stage guarantees: Every sample this stage produces is a finite number — never NaN, never infinite. This stage's internal state never settles into denormal numbers that could stall the audio thread. Bypassed, this stage's output is identical to its input, sample for sample. This stage never adds gain — its output level never exceeds what came in.
Alignment
Two more tabs — Align and Speakers — are the time-alignment instruments, and they are a different job from the Delay above. See alignment.
Native, not plugins
The EQ, gate and compressor are the mixer's own processing, not LV2 plugins loaded into a chain. They are always there, they cost no plugin slot, and they do not depend on anything being installed.
Plugin inserts are a separate, ordered chain on the same channel — see plugins and the rack. The two are never the same thing, and a plugin EQ in an insert does not replace or duplicate the channel EQ; it is extra processing at a different point in the signal path.
Feedback suppression lives here
Beside the curve, the EQ tab carries four panels: RTA, EQ, FBS and HRP. Pick one from the bar above the panel; the curve stays where it is.
| Panel | What it is |
|---|---|
| RTA | The live spectrum behind the curve. See the analyser. |
| EQ | The band editor — the encoder bank described above. |
| FBS | The automatic feedback corrector, which plants its cuts as ordinary bands in this same EQ. See feedback suppression. |
| HRP | The harmonic processor. See the harmonic processor. |
Pressing the panel you are already on folds it away and gives the curve the whole width. Press it again to bring it back.
Presets for one stage
A stage panel with presets — the gate and the compressor among them — carries a preset picker listing the console's factory presets first and then your own. Picking one writes its settings onto that stage of this channel and nothing else. Before it lands, the desk lists what the preset would move on this channel and asks you to confirm.
Copying a sound between channels
A channel config captures one channel's processing — its plugin chain and its EQ, gate and compressor — as a reusable named preset. Save it from a channel you like and apply it to another. See scenes and sessions.
For a quick copy without saving anything, the channel view's clipboard panel is a copy and a paste, each a row of part chips — single parts such as EQ, Gate or Sends, and groups such as Dynamics, Processing or Whole strip. Pick what goes onto the clipboard, then, on each channel you paste onto, pick which of it comes back out: copying a whole strip once and pasting only its EQ onto three channels is the common case. A picked chip is lit. A part the destination cannot carry is drawn dashed in red and cannot be picked, and its hover gives the reason. One undo takes a paste back.